Journaling is a whole new world to me. It seems there are dedicated teachers of this subject, encouraging good habits to help you record whatever it is you choose to journal. Focusing on your self-awareness can it seems, help you manage personal growth, your stress levels and increase your health and happiness. Well I am all for this. And so I have declared 2019 shall be for me, a practice of more creative writing, self-development and personal growth and I am very much looking forward to learning the new skill of journaling all this. I am also a self-confessed and possibly obsessive new year list and goal creator. All this will require new equipment and I am definitely a sucker for pretty stationery. So I will of course need new and bright pens and pencils. And a special and personal journal. I have looked around and whilst there are some wonderful choices about, many have a hefty price tag attached too. So I have decided to create my own unique and comparably inexpensive journal and today, in the fourth part of my mini series My Handmade Gifts for Friends, we shall be making a fabric book cover to give my cheap jotter it’s starring role. And I thought you might like to follow along and create the perfect Christmas gift for a loved one…
I have two ideas of how to cover a notebook with fabric. Firstly, sticking the cover in place and secondly, making a fabric book cover or book sleeve if you like. First, the sticking method which for me was not the most successful of the two. I chose a fairly thin and pretty linen fabric and cut it four centimetres larger than the opened book, on all four sides. I sprayed the front and back of the book with a thin layer of this adhesive and also the area inside the cover which the overhang of material was fixed to. I also made a dainty book mark by crocheting a little flower and sticking this to a long piece of ribbon which I then glued and fixed out of sight by tucking one end of the ribbon into the spine of the book. And I thought the pretty selvedge markings on the fabric added a decorative touch to the reverse of the notebook. I think if I had stopped there the project may have been a little more successful.


Instead, I took the first and last unruled pages of the notebook and glued these over the material in an attempt to hide the edges and neaten up the inside of the book. The finish was fine on the inside back cover, not so on the inside front. It was a silly mistake which a little more time and patience may have prevented. You know the two commodities I talk of.


Rather impatiently, I declared my sticking skills to be hopeless and had a quiet sulk. Then whilst walking The Spotty One the following morning, I had my light bulb moment. I decided instead to try my hand at an entirely new craft to me; making a fabric book cover. I will admit to being a little nervous since my sewing skills are fairly basic and the complicated tutorial I followed, talked of seam allowances and required me checking my measurements for the umpteenth time with the more fastidious Mr M. Once I had his reassurance my numbers did indeed add up, I set about measuring and cutting my beautiful linen which you first saw used here into a long rectangular piece.

The long rectangular piece is to measure the size of the open book, plus a two centimetre seam allowance around the entire piece of fabric (length and width) and then a further six centimetres (to the longest part of the rectangle) for each pocket. So to be clear, one more measurement of twelve centimetres to the longest part of the fabric. And why do I spell it out like you are not reading this properly? Because I didn’t read it properly and I only added one measurement of six centimetres. You need two measurements. One for each pocket. And then I only realised my fabric cover didn’t fit when I had neatly finished it. So I had another little huff and will now have to make a few more love hearts to use up this ‘wasted’ fabric. N.B. I took full responsibility for this misdemeanour and did not even attempt to shift the blame onto Mr M who had funnily enough, disappeared when he heard my sharp intake of breath.
Once you have the correct size fabric, turn over the two shorter sides by your seam allowance and stitch in place. I find pinning them, then ironing them flat and then removing the pins before stitching, to be the easiest way.

Then loosely fold the entire piece of fabric in half (to look like a small book cover) with the right sides of the fabric touching (effectively an inside out book cover) and then fold over the six centimetres at both ends of the material which will create two pockets. Stitch the upper and lower seams of each pocket and you will create two inside out pockets. Do not stitch any more than the pockets at this stage.

Now turn your pocket fabric inside out and you will have two pockets this time with the right side of the fabric showing. Back over to the iron and iron the pockets flat.

Next you need to turn over the seam allowance on the lengths in between the pockets, iron them down and stitch them in place. I have indicated the area which requires stitching with a pencil in the second photo.


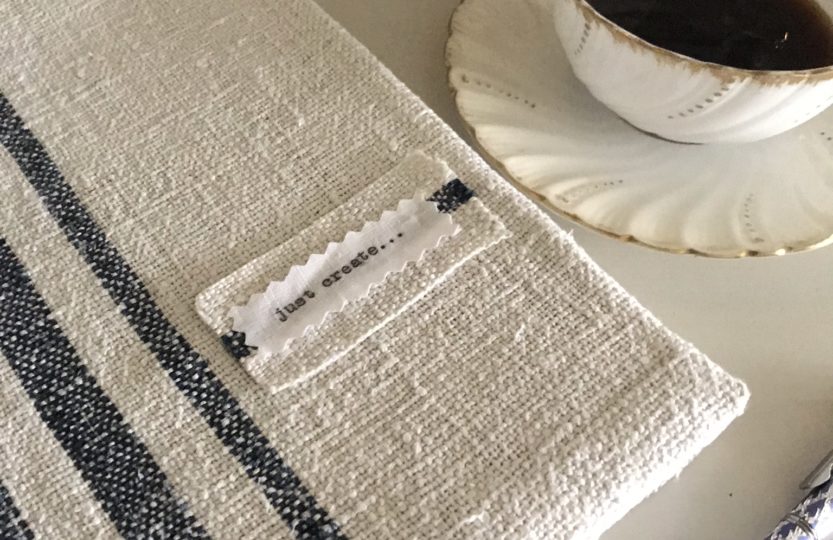
Back to the iron and press the entire book cover into shape. Mine looks a little wonky in the first photo. This is due to the thickness of the fabric I chose and not my inability to stitch in a straight line. If your chosen fabric is thinner than mine, you will notice a more even shape at this stage. I added a little inspirational message on the front using my much loved typewriter and glued the message in place on the front cover.


Now take your book and tuck it into the sleeve. And that is how to cover a notebook with fabric. Indeed get your measurements correct and that is how to cover any book with fabric full stop. Any book you like. Who knew making a fabric book cover would be quite so simple? If you get your measurements right that is.

I visited the local pound store recently and bought three notebooks with semi padded covers for £1.99 each. I also bought these pretty six pencils from here each with an inspirational quote for only one pound.


I wasn’t too sure which project I would use them all for or who might be the recipient at the time. And I have learnt much about myself throughout this Christmas mini series. I am not quite the altruistic person I would have you all believe. Far too many of these gifts have not been gifted at all and are languishing in my cupboard. Still, there are a few more weeks to go before Christmas.


I hope you enjoyed this weeks gift idea and as always, let me know if you have a go yourself at making a fabric book cover. Next week is the final part of this mini series My Handmade Gifts for Friends and I have a wonderfully simple craft which can be used in all kinds of ways to gift and decorate for the festive period. Until then, happy creating…x


If you would like to see all My Handmade Gifts for Friends in photos so far, click here to visit my gallery x







Oh yes what a fabulous idea Jen, I know just the person who needs one of those!…thank you for the ideas and for reading Jen x
Another lovely project. I love fabric wrapped notebooks and they make super diaries too. x
Aah so glad you like this one lovely…a surprise to me how easy it was once I got going! Happy week for you x
Fab blog as always Hels, Gorgeous book covers….Xmas pressie please! Xxx
Thank you lovely Christine, so glad you like these books. Once I got going the loose cover was surprisingly easier than I had thought. I’m looking forward to learning the journal skill for 2019! Have a great week x
Another enjoyable read Hels and how gorgeous are those fabric book covers! You clever lady! You do have a lovely writing style and I bet your journal will be a fab read too once you start writing it! xxx
Then it shall happen!x
Thank you Cathy so glad you like them. I have thought of this journaling business for way too long now…it’s 2019 or never! Have a lovely week x
Oh I would love that soooo much! Xxxxx
These are lovely Helen. Like you, I’ve always fancied having a go a journaling, but just don’t seem to get beyond my good intentions. Maybe next year will be THE year?
Ahh bless you dear friend… so glad you like it and not half as difficult as I thought it would be. One of these would look lovely with a design from your snazzy machine!x
Hi Mary Katherine, I’m so glad you like the idea and I love that I add ‘style and whimsy’ to your life, that did make me giggle! My sewing skills are very basic and I am way too impatient which accounted for my initial mishap, didn’t want that happening to anyone else! Have a wonderful week across the pond x
Ha Ha I know you do! I’m so glad you like them though, they were much easier than I first thought they’d be so perhaps I’ll make a few more! Thanks for reading darling x
Ha Ha sit still long enough and you too shall be covered Little Miss! I’m so glad you like them perhaps I shall make one for you!x
and yet another lovely idea…. made beautifully..xx
What a great idea! I love the linen fabric. This really looks pretty simple for those of us who sew, but I like the way you explained it very gently for those who don’t 🙂
Thanks so much for the extra dose of style and whimsy you add to my life over here across the pond.
These are absolutely brilliant! May be up there with the top of your creations!! Like Mr M, I also promptly disappear when I hear that sharp intake of breath!!
Oh wow how much do I love these…
Nothing is safe in your presence until covered is it?! I’ve even heard you’ve found a suitable cover for The Spotty One through the winter months…!!🙊😂
You’re simply the best. The funniest and I would love to get my hands on that journal of yours I can imagine it would keep us all laughing for hours!!
Can’t wait for the next one Thursday’s are so happy with your stories!xxxxxxx