Serendipity struck recently at Whitewood and Linen headquarters. A series of events which were enough to tell me I need look no further for the creative challenge I sought. I have offered handmade Christmas gifts before through my blog, this year though I was keen to try and create something a little different to my norm and as always, aiming to reuse and recycle where possible. I didn’t want the craft to be too difficult, creating should always be enjoyable after all, I imagine I wanted to challenge my creative self just a little further. And so, in the hope of finding an entirely new process, journey and result, I stepped right outside of my creative bubble to make peg doll fairies. Do join me for the first part of my seasonal miniseries Four Fantastic Weeks’ of Festive Fun. First though, my serendipitous story…..
Quite by chance I was searching Pinterest recently for a totally unrelated quote when I stumbled across the words of Greta, aged 4 who said “I really love being a human but some days I really wish I could be a fairy.” Greta’s idea seemed appealing and so I clicked out of interest. I imagine I set an algorithm of sorts in motion as I began to receive a deluge of fairy like craft suggestions to my inbox. Next whilst browsing my Christmas craft books one cosy evening, again for something entirely different, I came across a family of intricate peg doll Christmas fairies whose outfits were a little dull and frankly un-fairy like to my mind. I puzzled as to whether I would dress peg doll fairies differently using my recycled and vintage stash, were I to make some. And then as I sought out an old Christmas book recently, I found my final nod to fairy creating; a precious old card given to Little Miss before she took a school exam some while back. In fairy like font it declared “What if I fall? Oh but my darling, what if you fly!” Such serendipity cannot be ignored and so it was out with the fairy peg doll making paraphernalia. You can buy wooden dolly pegs here if you like.
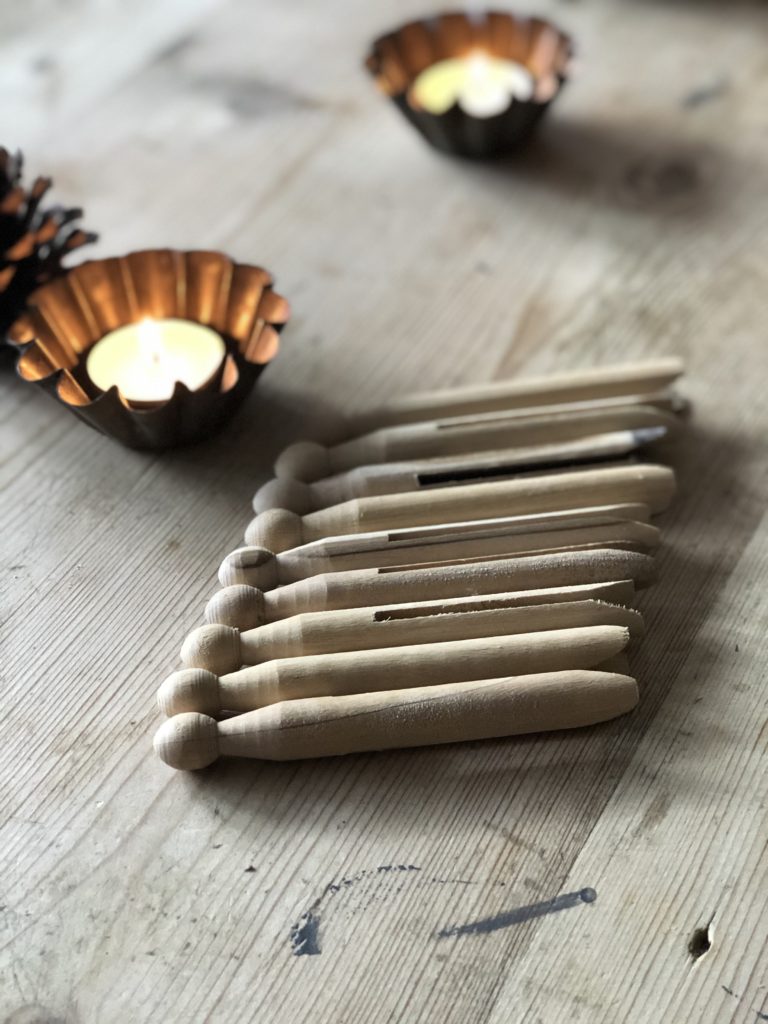
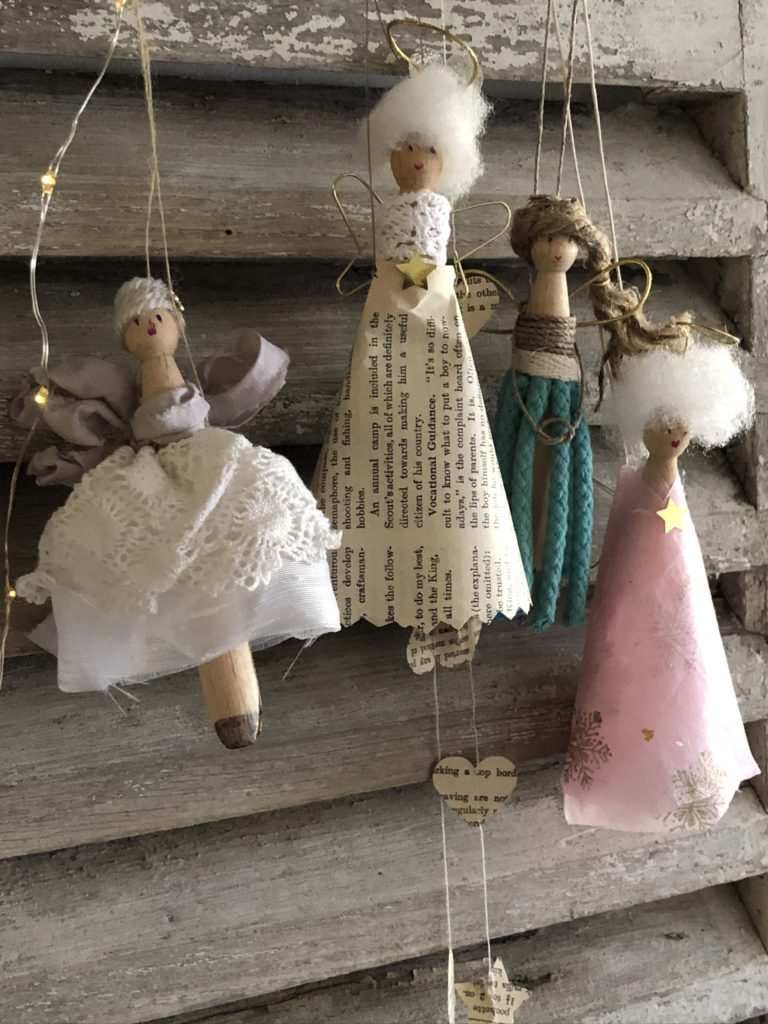
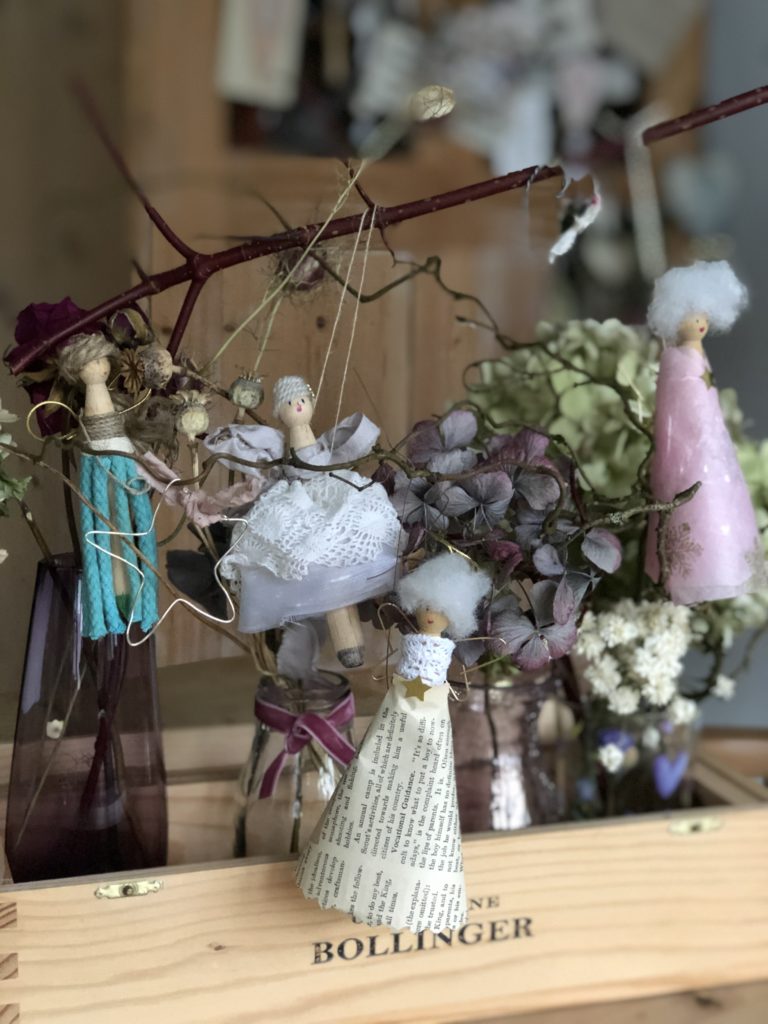
I assembled a prototype first so I could suggest a format from which to create and to see which part of the process might need tweaking. There was a need for much tweaking. Here is she with all her hair; you might like to start with your tweaking at this point…

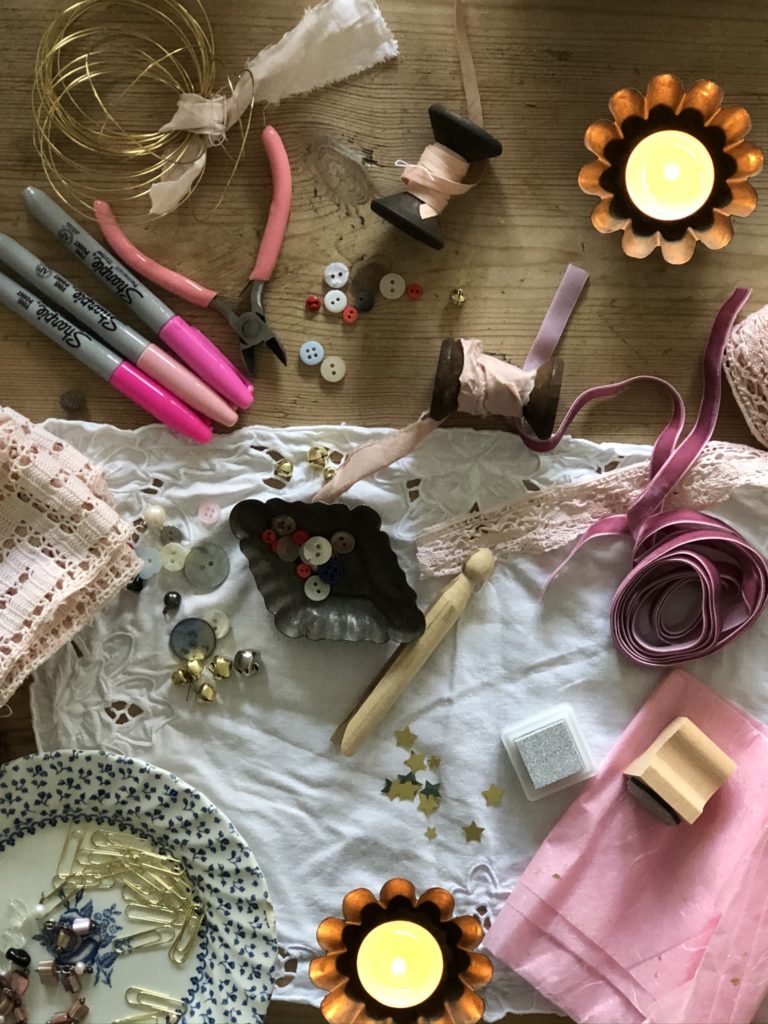
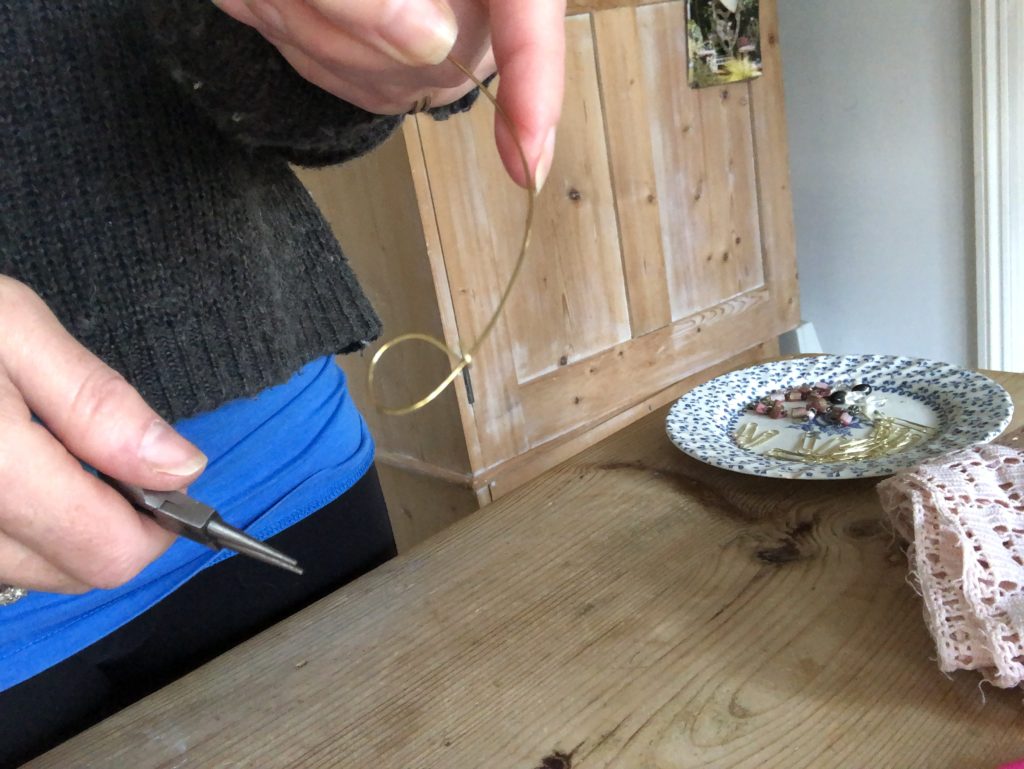
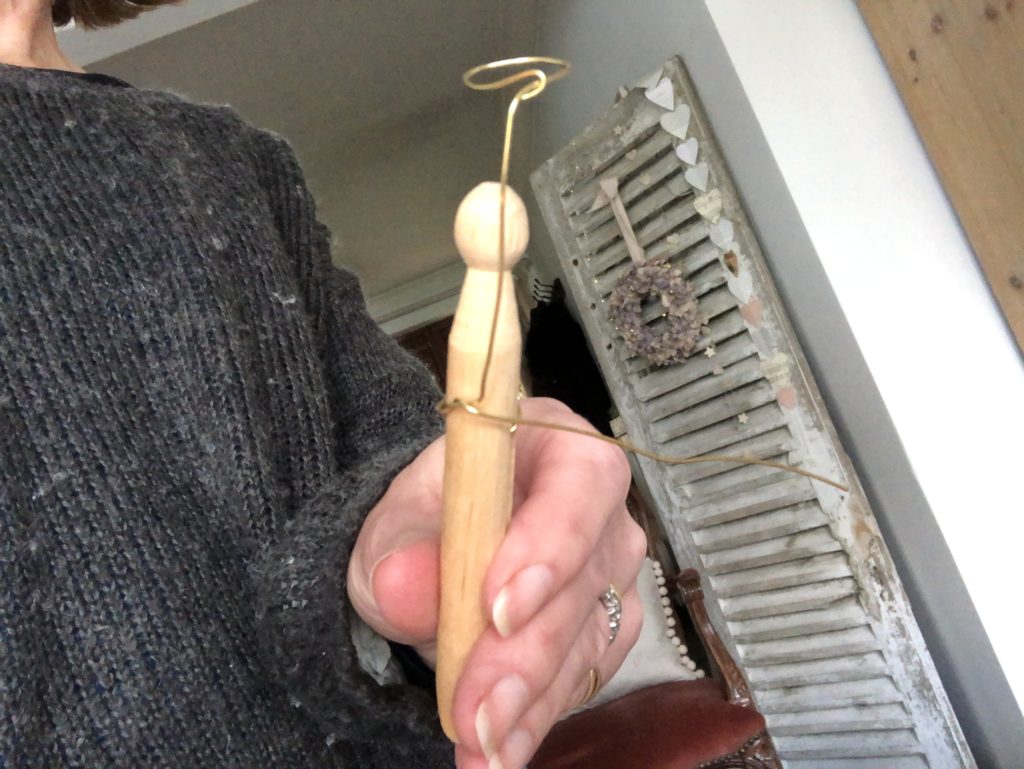
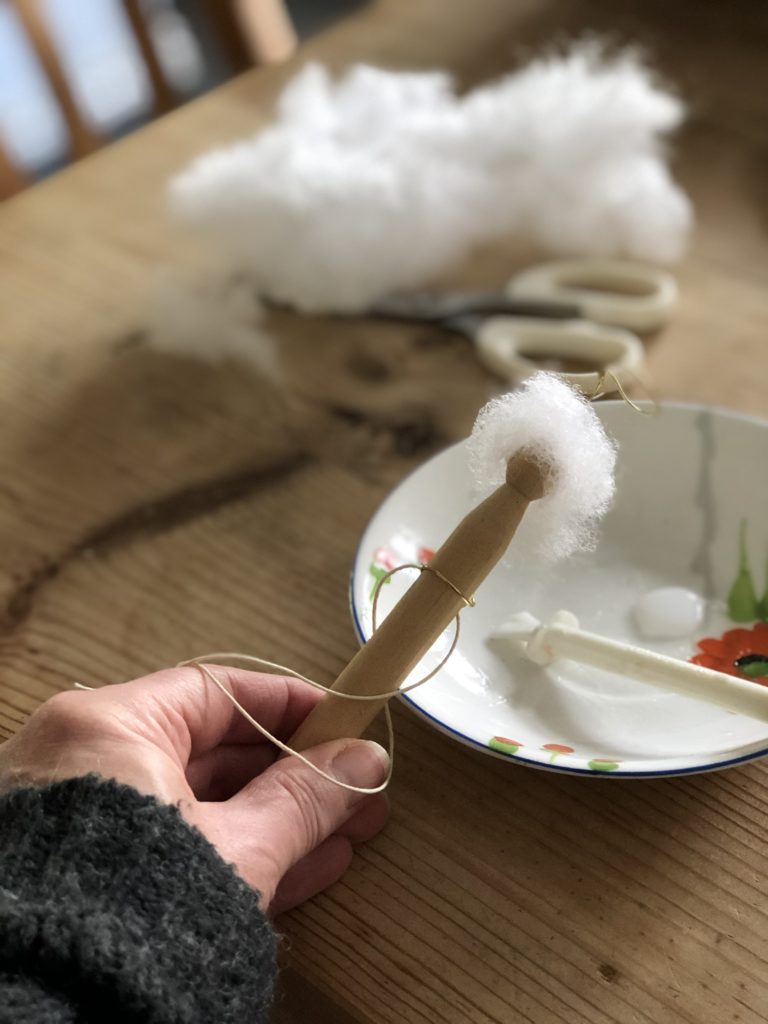
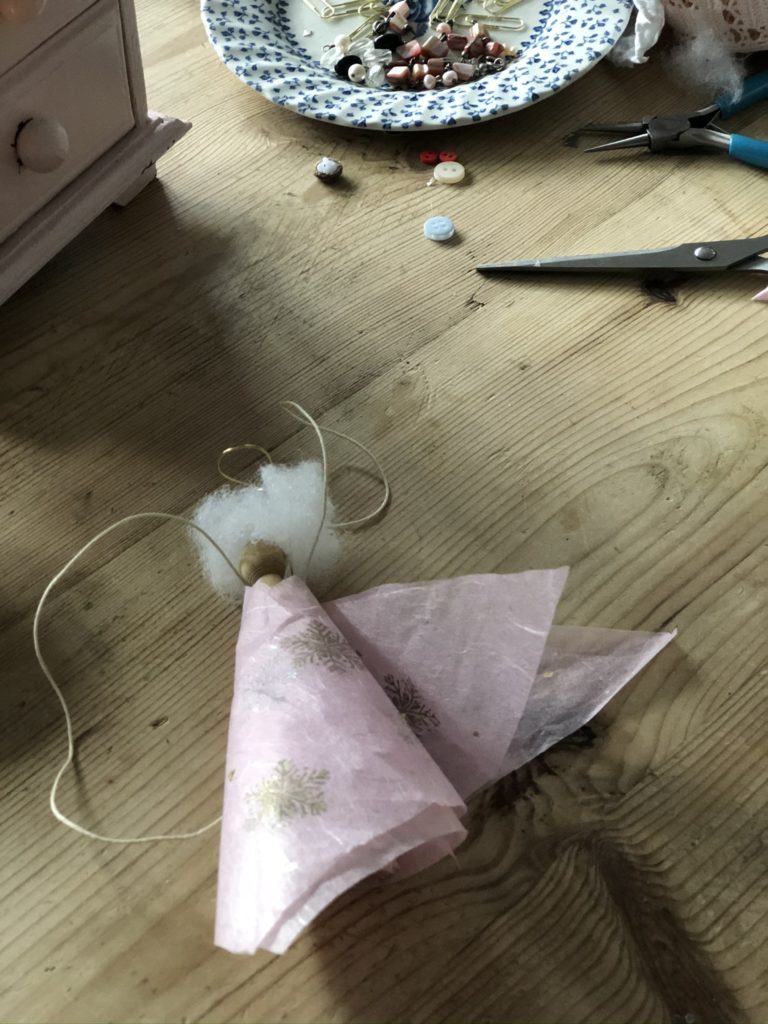
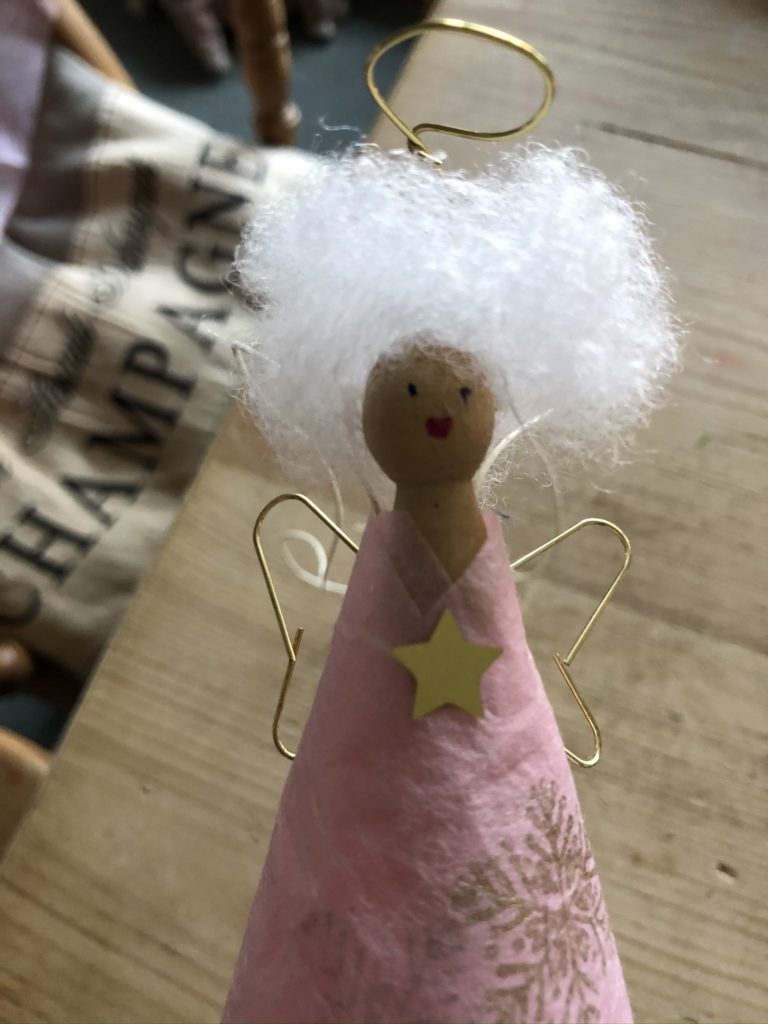
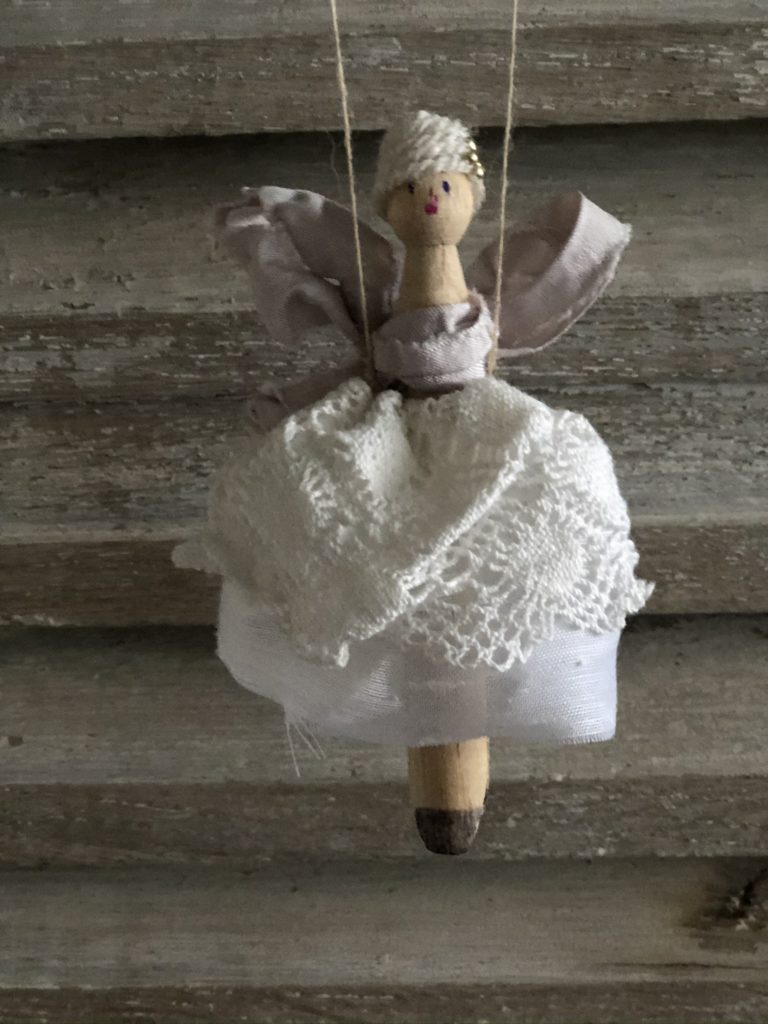
Armed with peg doll knowledge for my next Christmas fairy, I began by fashioning a piece of gold wire (approximately 28 centimetres long should do it) into a halo which all good fairies must have. However long you decide the length of your wire, make sure you account for your fairy’s hair sitting on top of the peg. You see here how I have fastened the wire around one of the fairy’s legs to stop her halo slipping.
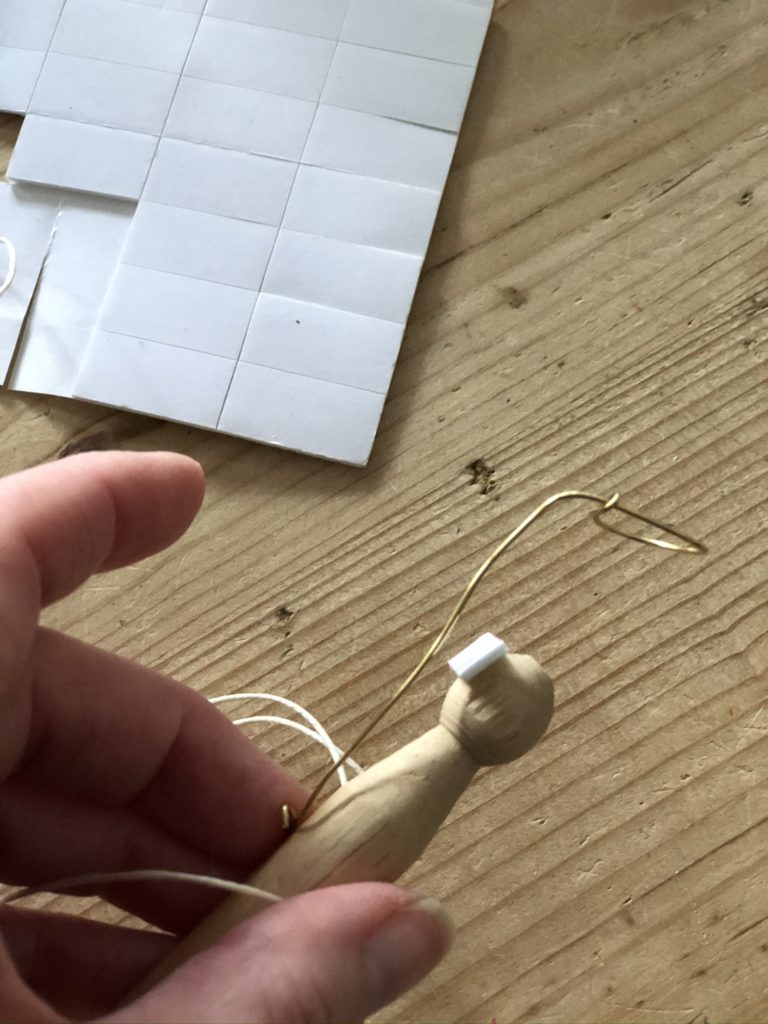
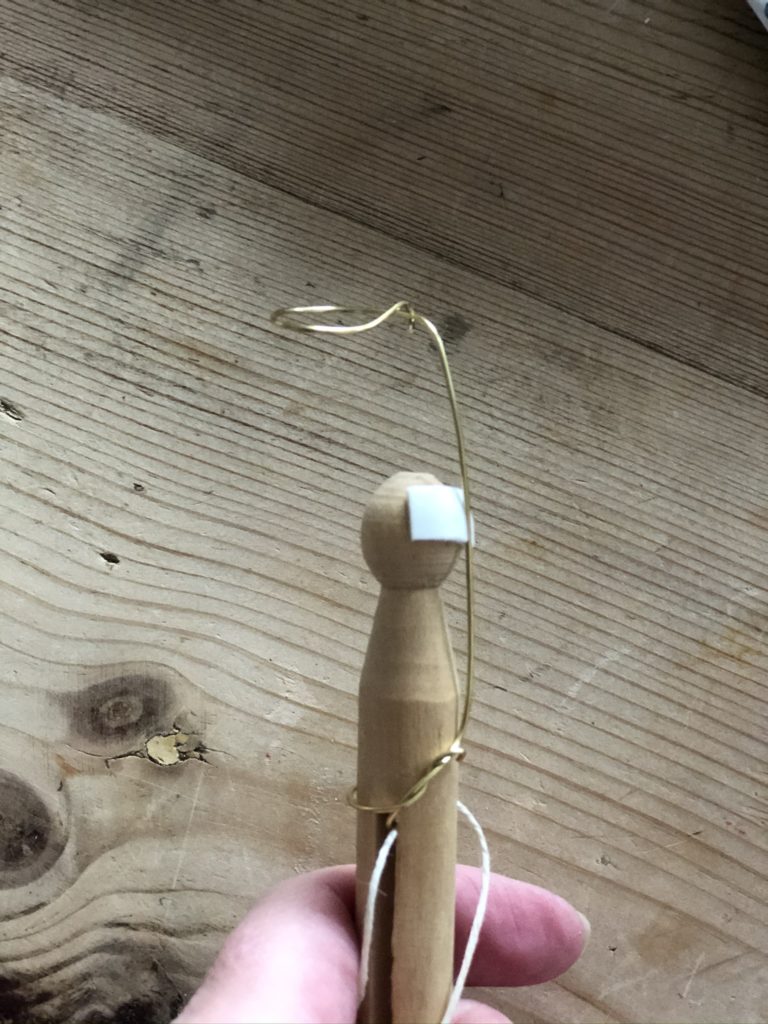
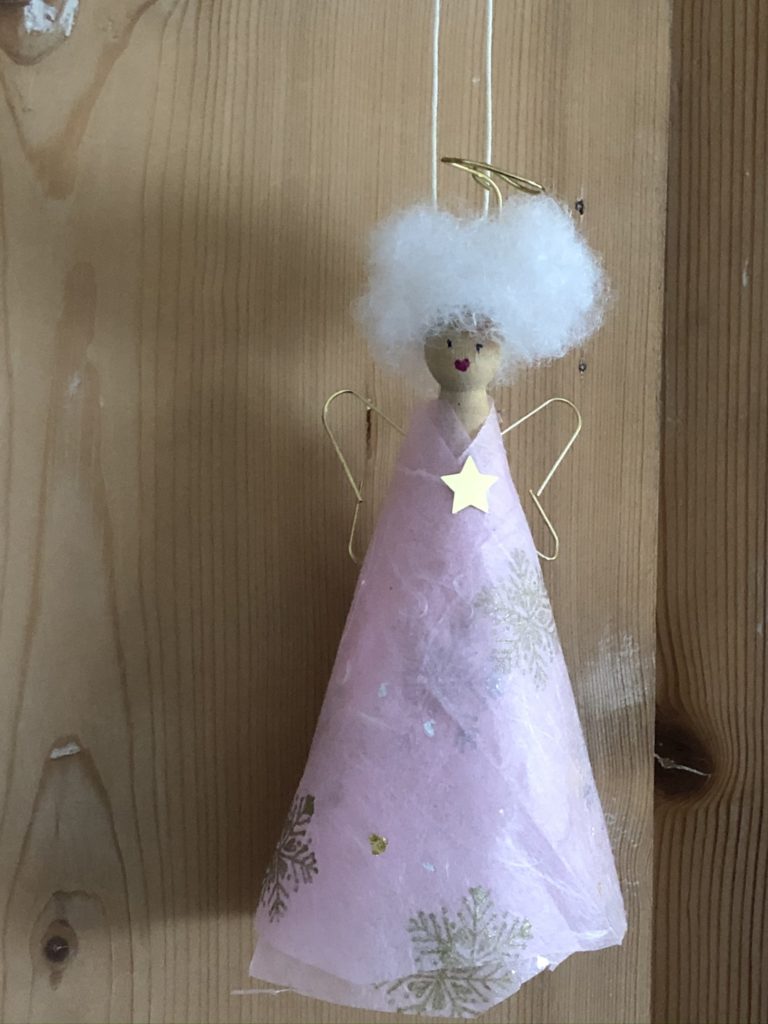
Choose your hanging medium next. I used thin string here and in another fairy later, you will see an invisible wire used. Both worked well. The white square you see in the photos below is double sided sticky foam. Glue dots or craft glue will work just as well. Both the halo and hair fix to this so make sure your sticky is big enough.
Then work on your peg fairy dolls hair. I used toy stuffing. You could use wool, string or even cotton wool and you simply apply more craft glue to hold in place.
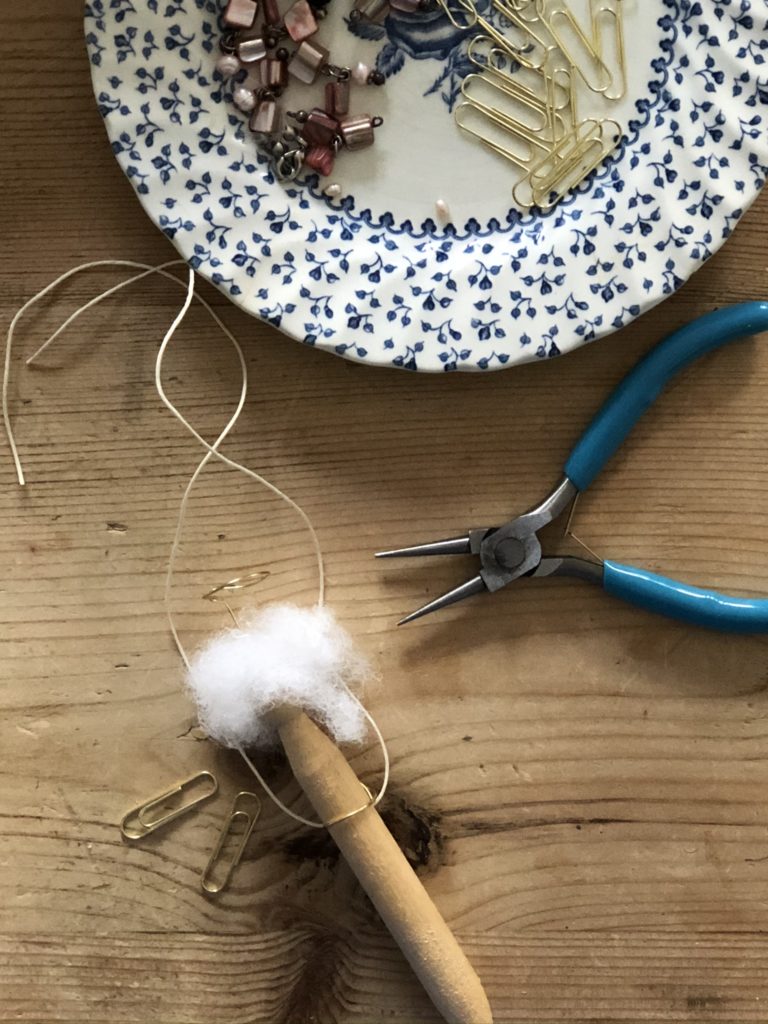
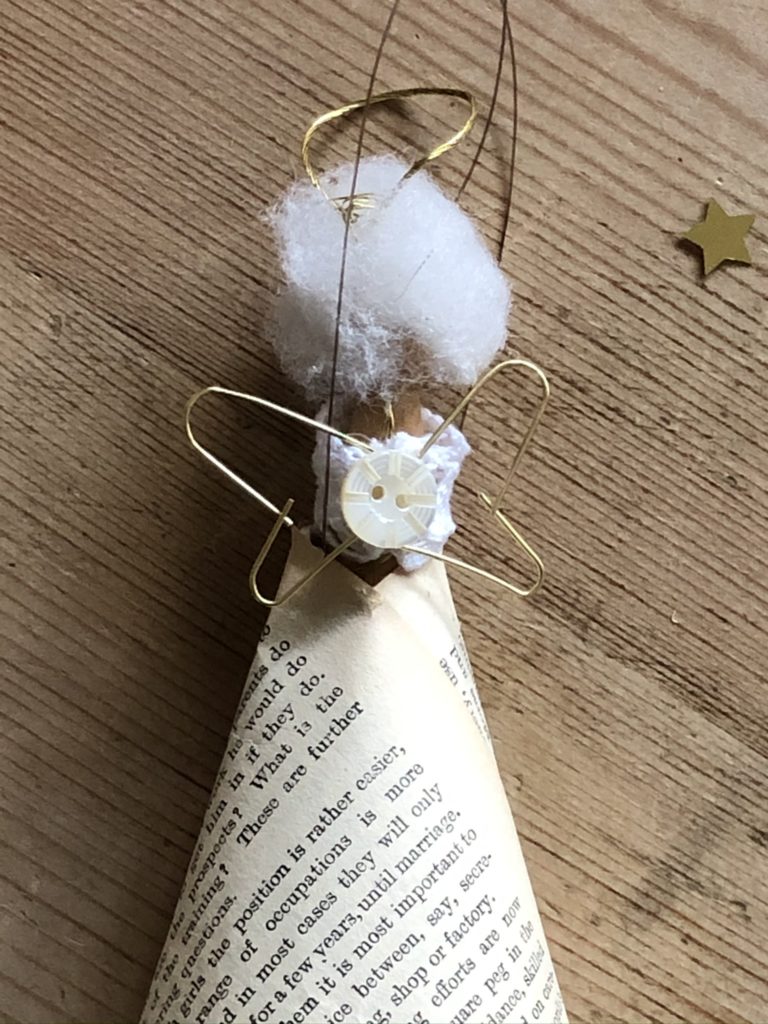
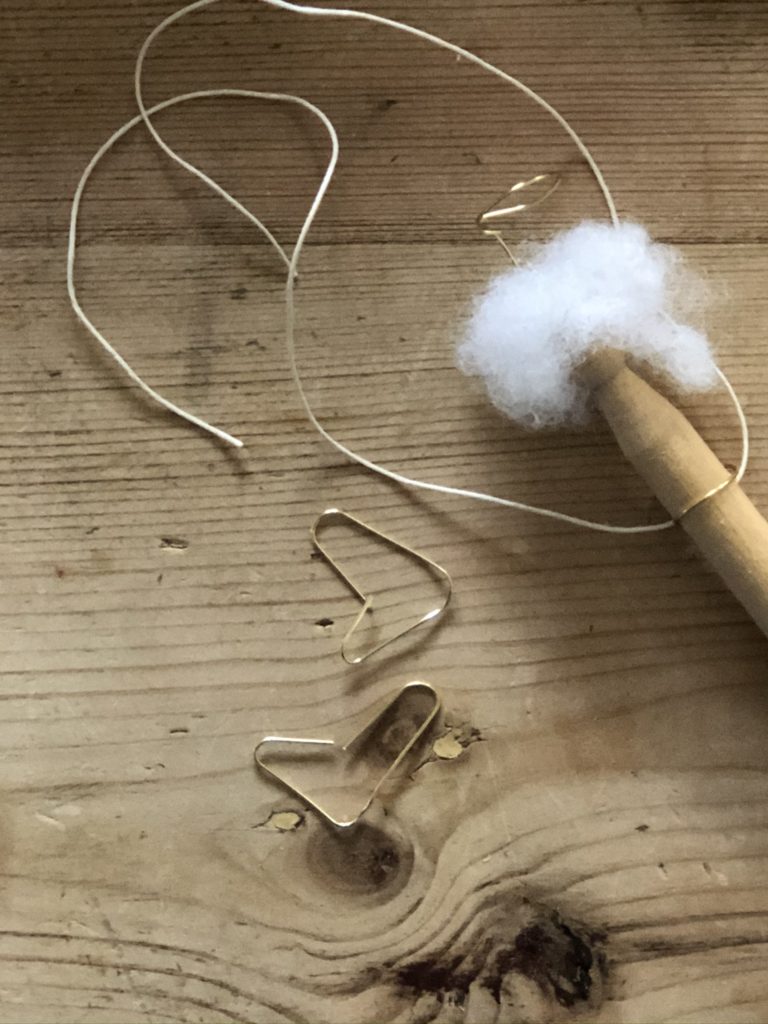
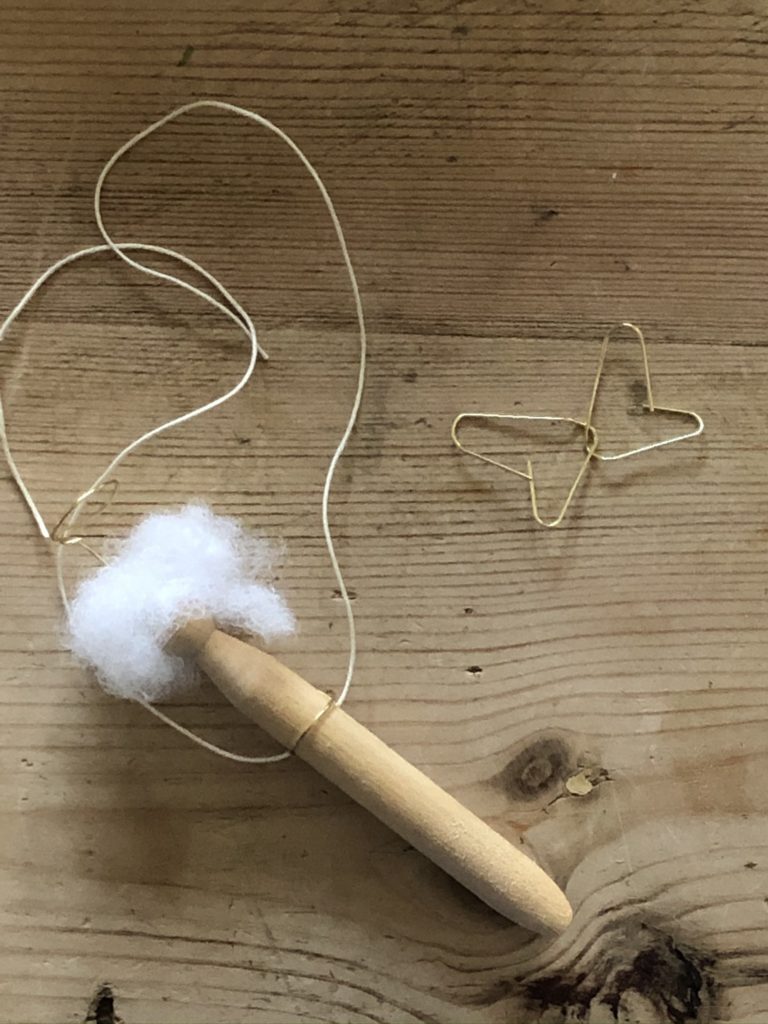
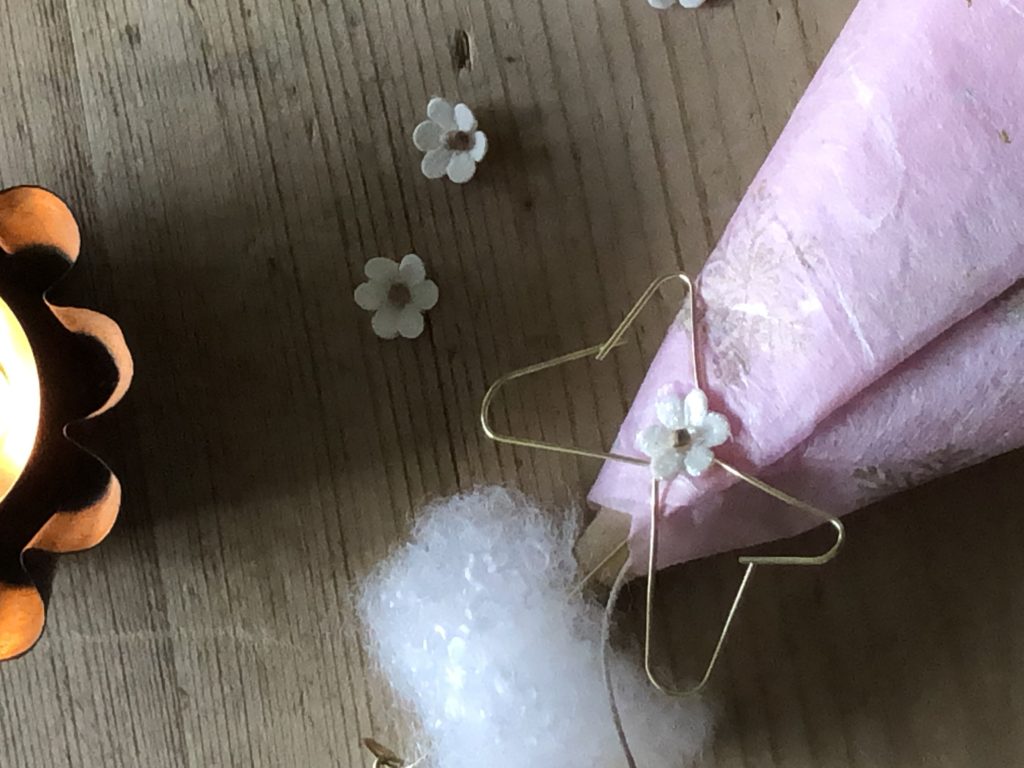
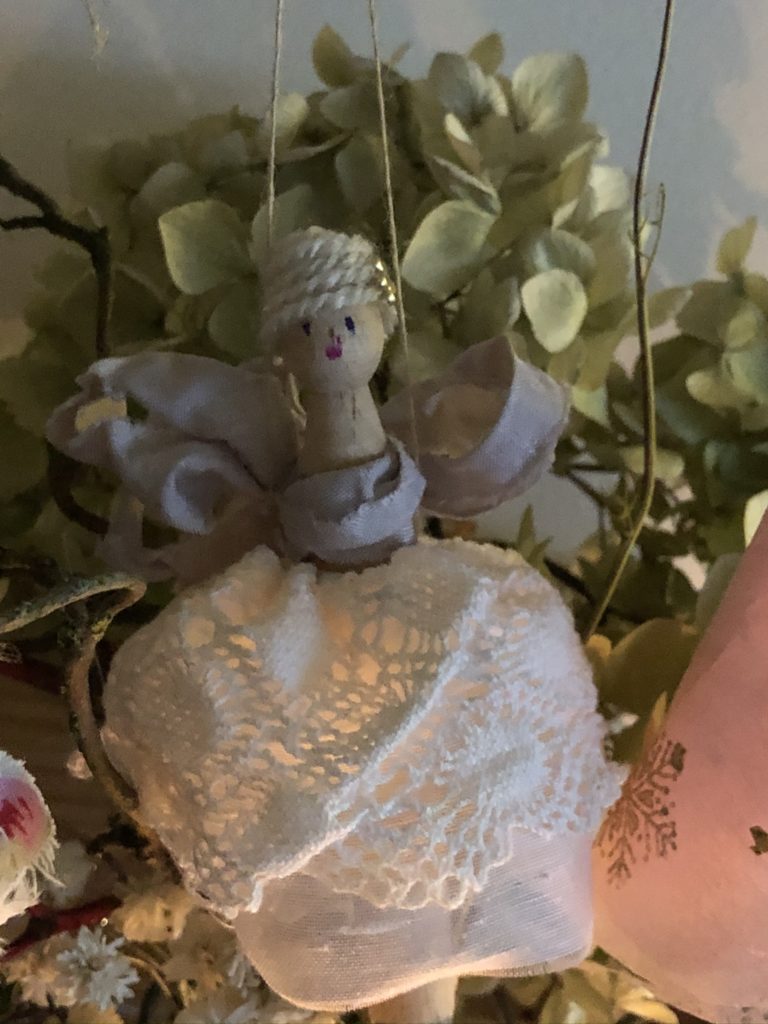
I rather ingeniously, if I say so myself, shaped a pair of wings from gold paper clips… For the record, I absolutely did not copy nor did I adapt this idea from anywhere else. Credit where it’s due, it was all my own imagination, ’tis the little things in life…
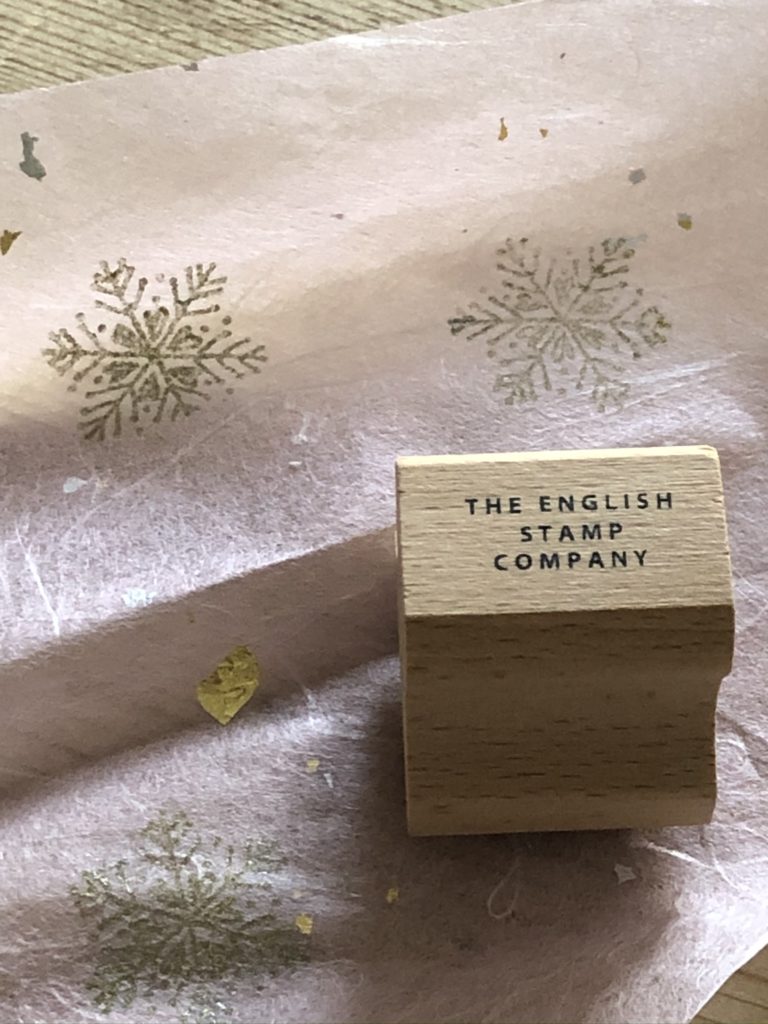
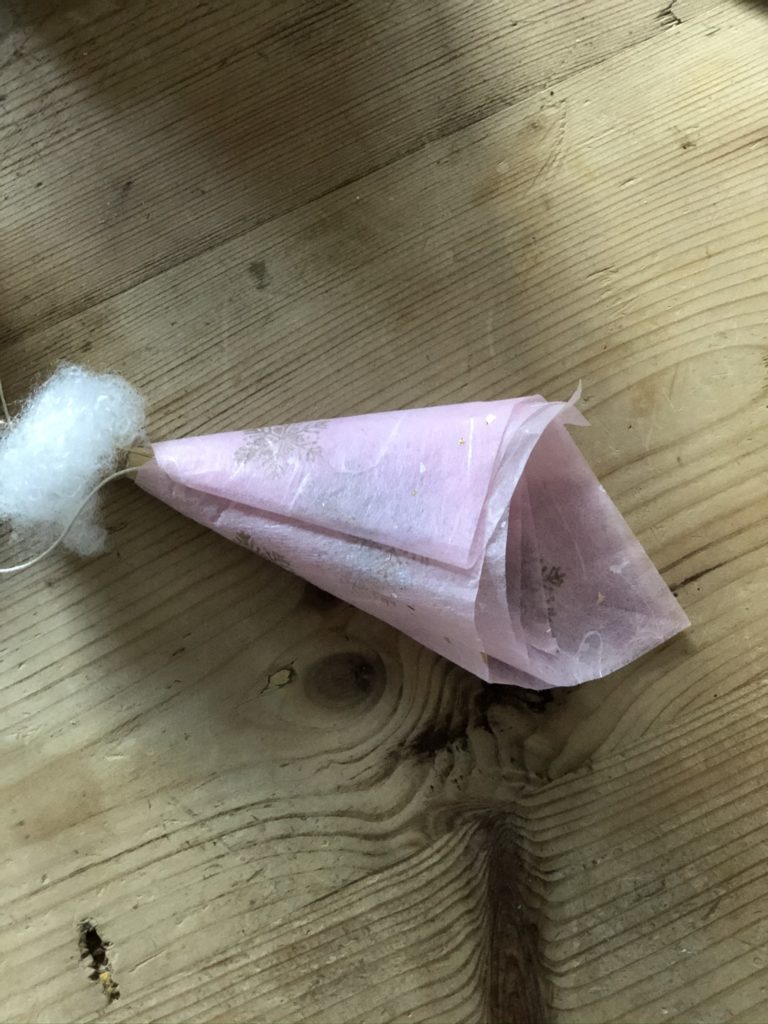
Next comes the dress. A scrap of pretty pink paper with gold and silver flecks embedded was used and created the perfect opportunity to use my new silver snowflake stamp for a little more Christmas bling. I cut a square in half diagonally and two teeny triangles for the neckline.

Place one triangle on top of the other and wrap and twirl the paper around your peg doll fairy. Top Tip: have your square larger than you would wish for your finished fairy dress and then you can trim the length accordingly when she is wearing it. I glued the seam with craft glue and then added a heavy-duty glue dot carefully to the back of the dress where I wanted the wings to sit. Finish off with something decorative to ensure no glue can be seen or left exposed. A button would work just as well as this tiny craft flower.

Next colourful Sharpie pens create eyes and a tiny heart for the mouth and the gold star adds a final Christmas sparkle. You will recall from previous handmade Christmas gifts; I don’t do glitter often nor do I do tinsel at all. If you do, now would be as good a time as any to add them. I know, I know, I just love big hair…
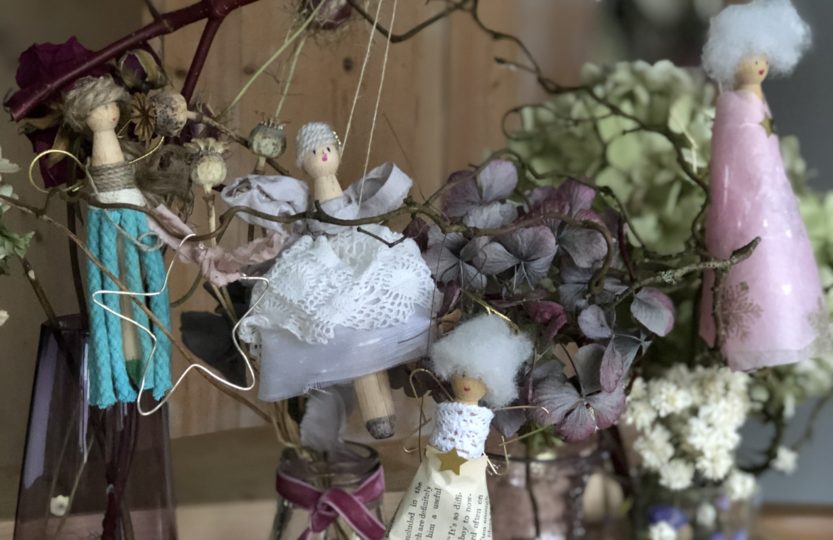
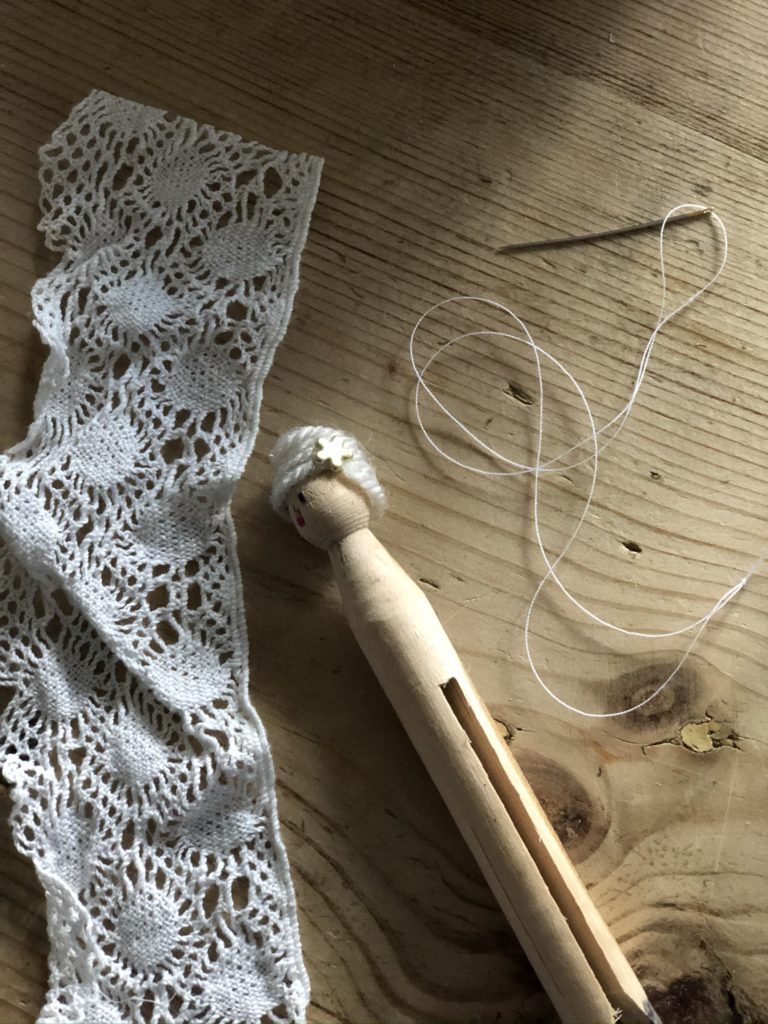
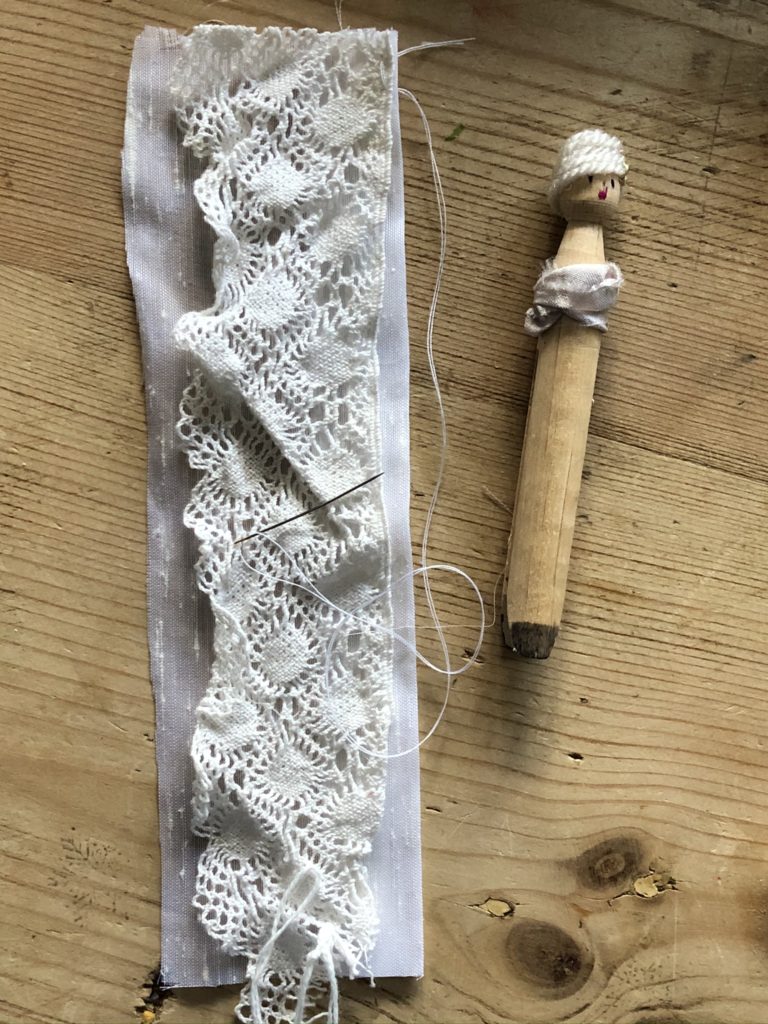
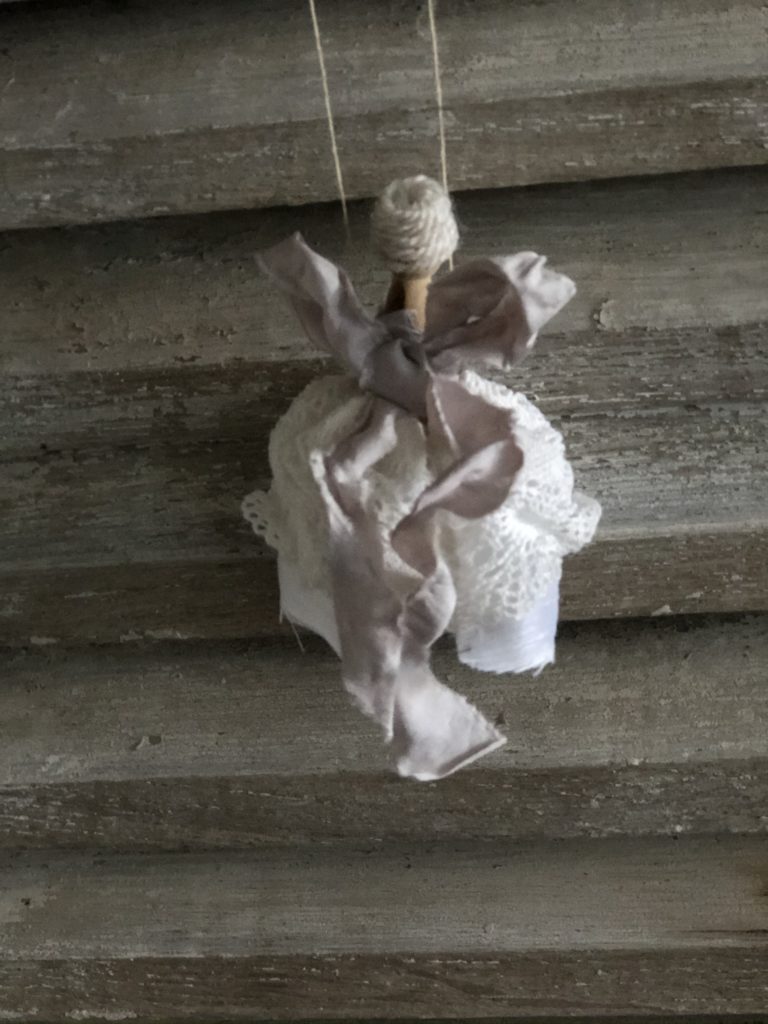
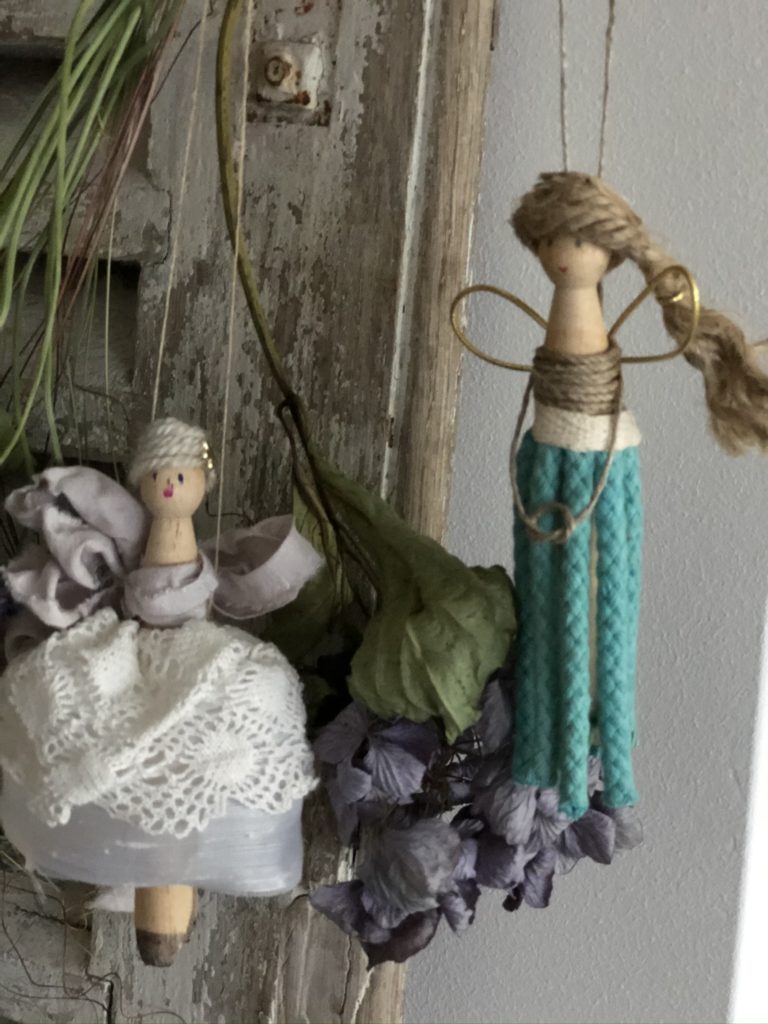
I got a little more advanced in my technique for the muted lilac fairy doll as out came the needle and thread and I stitched a pretty skirt with a simple gathering stitch at the waist band from an offcut of vintage lace and voile. And I toned down the hair somewhat. This time it is concocted from wool and with a stud paper clip for hair treasures, you can see the improvement I am making can’t you? Her bandeau is a simple twist of vintage ribbon and both are secured again with craft glue. Finally, a simply tied bow from the same vintage ribbon acts for wings and we now have a flutter of three fairies.
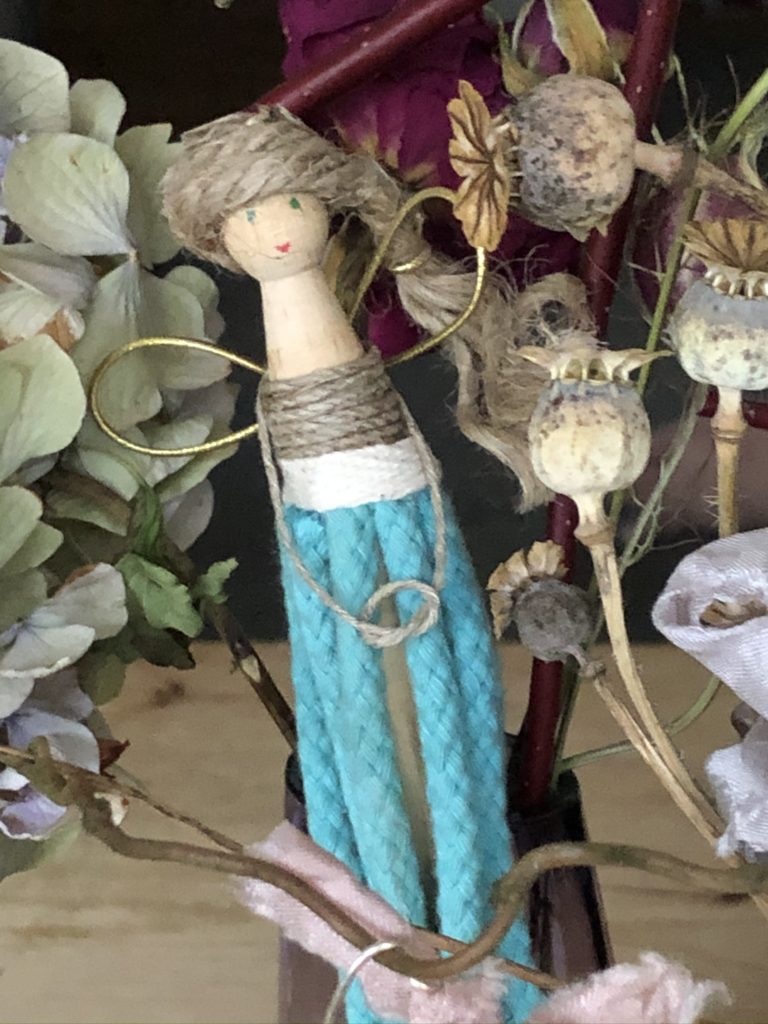
For my last fairy I challenged myself still further. This time I was to see if I was able to create my most frugal fairy of all. I allowed myself only the contents of this glass jar. Off cuts of string, twine, shoelaces and rope tassels – all recycled from paper gift bags, boxes and previous projects. You will note… no ribbon. I imagined this to be a near on impossible task however I was pleasantly surprised with the result. If one is allowed a favourite fairy, Frugal Fairy is mine.

Clearly my peg doll fairies have not been made with little ones in mind, they contain bits which would be most unsuitable for young people. Your fairies could easily be adapted though should you find yourself with time on your hands and little ones to entertain.
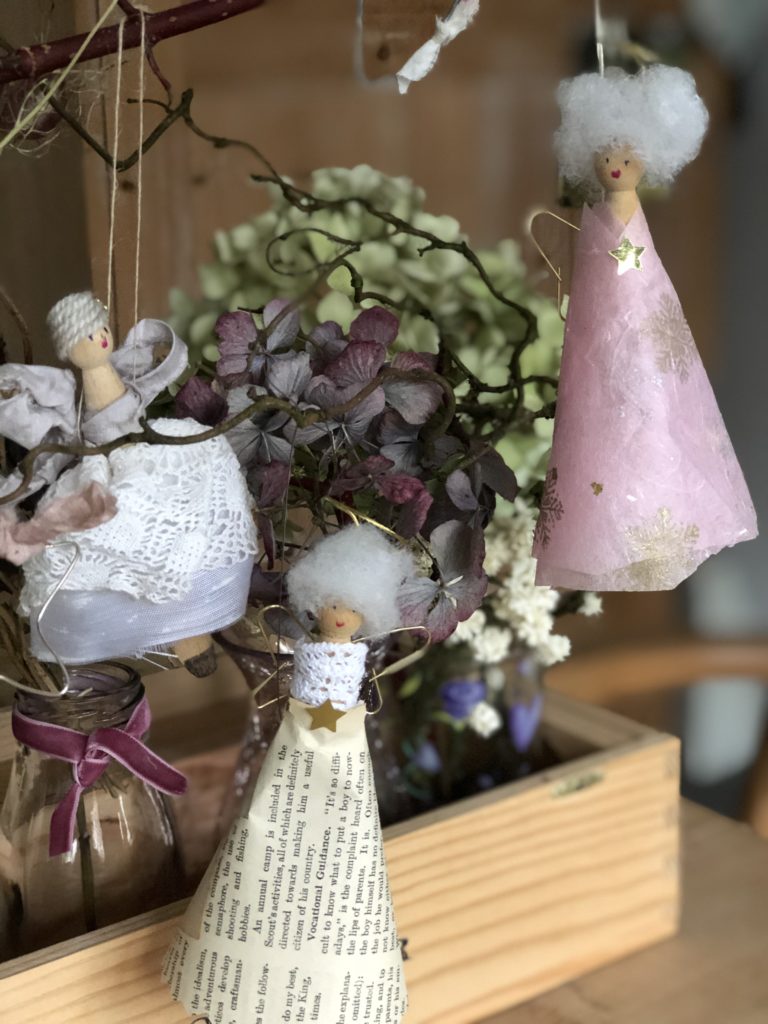
These fairies will look perfectly at home once the Christmas tree is dressed and will make wonderful handmade gifts to those who are of the fairy persuasion. Who knew it might prove rather tricky getting four peg doll fairies to line up for a photo call. For now my frolick of fairies – a google search declared a number of terms to describe a group of fairies, I was not familiar with any of them – are flying in their own enchanted forest of course.
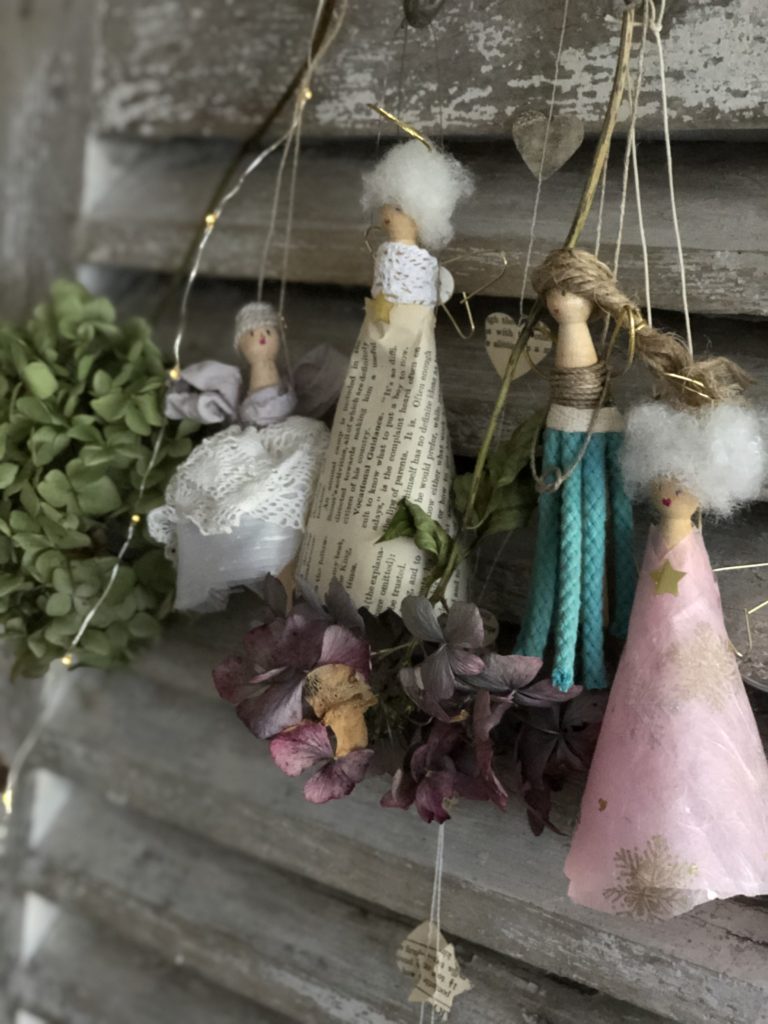
I wasn’t too keen on saying goodbye to the dried hydrangeas in favour of full on Christmas décor yet and this setting seemed a fitting compromise. Perhaps your collection of peg doll fairies will nestle amongst your baubles or maybe they will be a part of your Christmas gift making this year. If you do create fairy magic, do share so we can all see. I had thought these would be trickier than they were, so if you have never stepped into a tizzy (thank you again Google) of fairies before, don’t be put off venturing out of your creative bubble, it made for a happy change. Until next week…
If you missed the recent story of a wonderfully creative day out making heirloom fairies click here to catch up x


How lovely to think of you and your girlies making frugal fairies… they are a truly lovely craft to make Karen and I can only imagine how wonderful yours will be … I do hope I get a peep!x
Oh, Helen! I have been trying to think of an appropriate Christmas craft to do with my girlies and I am inspired! And in true @ostrichandsilkworm fashion I feel it must be a frolic of frugal fairies (perhaps with a dash of darns thrown in for good measure!) 💕
What a wonderful and kind comment to read TG thank you so very much. I am beyond flattered you’re working your way through the posts… that will be a lot of crafting and upcycling!! It will also be wonderful to get to know you more over the coming weeks too, glad to have you join the journey!x
Thank you for publishing such fun blog entries. I only recently discovered your blog through Instagram and I’ve enjoyed starting at the beginning and reading through all your great ideas. My daughter and I recently made 5 peg doll fairies for our Christmas tree after we were inspired by your tutorial. I love your crafting and upcycling ideas – please keep them coming. 🙂 Have a great day.
I like fugal!!x
.. you too Helen 🙈sorry for the miss spelling ‘Frugal fairy’✨
Oh you are too funny… you’d have it all you lovely human bean you! I am so happy you like the fairies too, are we big girls ever too big to appreciate a tizzy of fairies?! Have a lovely week my dear friend x
Wow Alison… what a compliment, thank you sooooo much “a favourite subscription (especially the Christmas edition)…” I think I may just retire now! Only joking, much more to come before the big day itself and I am so happy you appreciate Frugal Fairy like me! Have the best week Alison x
I want one…..pleeeeease!! 😊 Oh Helen you are a very clever lady. Those peg fairies are so individually cute! I love them all. They are gorgeous and will most certainly look beautiful hanging on your Christmas tree.
✨😇✨.. I’m the same as the lady above.. Molly, ‘Helen’s blog’ arriving is the same feeling as when your favourite subscription Home magazine.. ( especially the Christmas editions) drops through your letterbox …Ahh, making a special moment to have a ☕️ and read✨ Fairies 🧚♀️ are so cute Helen and have to agree ✨’Fugal Fairy’ ✨ has stole my heart 💫x
When my stories land in someone’s inbox I consider it a privilege and I am beyond happy to know you are one of them… I have something special coming soon for subscribers! Oh to be a fairy for a day (she types wistfully) and such an appropriate comment to mention my head during the build up to Christmas Molly, I try very hard to slow and calm down chaos continually… ’tis an uphill climb! Have a lovely week ahead!x
Oh I imagine a special little pink lady would love to make these with my friend! Thanks for catching up… it’s a real honour to know my stories are worth setting time aside for, thank you x
Helen for the first time this arrived in my in box..and I know it’s Thursday even if it is Friday in the real world!
I just love the idea of becoming a fairy, even just for a day!
You are such a clever, patient lady, I think being in your head is a very Happy place
I just love the crazy haired fairies, you can have such fun with these . Just adorable 🧚♂️Xx
I love these!! They’re so pretty. You clever thing Helen ❤️ Xx
Thank you so much Sally, I’m so happy you like them, they’ve been a bit of a hit today! I love the collective terms… a tizzy of fairies, who knew?!x
Oh ’tis my absolute pleasure always Debbie, thank you for reading and letting me know you enjoy the blog too… seems we ladies love our fairies!x
You are one clever lady Helen, I love them all, A flutter of fairies, delightful. . Xx
These are so cute, Helen!! Thank you for sharing your sweet ideas. xo
Hi Judith, thank you for such a lovely comment. I thought exactly that as I made them, it would be such fun as a group doing this! I think those with grandchildren and small children could make a nice interpretation too… have a lovely week ahead x
Thanks lovely, we’ll never look at a paper clip in the same way again will we?! Have a lovely weekend x
So clever…I love the paper clip idea…so ingenious x
oh gosh, these are the cutest I’ve ever seen! Love them :o)
I think it would make a great craft to do with other people, too! I like the great difference of each of them; they truly are their own characters :o)
Tiny!!!! How funny and kind you are! Sometimes I think my head might pop with all the ideas still to come and I am so glad that my readers aren’t too grown up for fairies!x
Thank you so much Janine I’m so glad you enjoyed the craft today!x
Ahhhhh this is just the BEST!! I absolutely am in love with these fairies they are sooooo perfect each in their very own way!
I love how much fun you’ve had making them. Just the BEST! You’re the most magical of all and I just can’t understand how such a tiny lady has so much creativity inside her!
I can’t wait for next week!
These are gorgeous. What lovely gifts 💕
Oh my word that would have been the cherry on my creative cake! What fun we would have…thank you for reading and for your kind and cuddly words… much love always x
hi Helen, these are as adorable as you!!! ~I love how they look hanging altogether…too sweet..my only wish is that I wish `I could have been with you making them together!!!xx