I promise you the following conversation actually took place. “You do know that ones got a huge split in the wood don’t you” said Mr M. He was addressing an off-cut of scaffolding board which I was turning into a pot stand for hot dishes on the patio table. “I’ve got better ones you could have, cleaner, smoother, less… less tatty” he said. Strictly speaking not a conversation since I said nothing and just looked at him quizzically. Sometimes I wonder if he gets me at all. I’ll show you that quick make at the end of this post. For now though I have some pretty terracotta pots and flower stencils to share with you in this weeks pot decoration craft post. As ever, great gifts for your friends and family or as with all my creations, little treats just for yourself…
You’ve seen me stencil items before here and since I was more than pleased with the results this craft yielded, I naturally assumed this flower stencils project would be as easy and as rewarding. Not so. This project wasn’t quite as straight forward, as you will read when the story unfolds. Firstly, I gathered together vintage and new terracotta pots and also a few of those pretty little terracotta dishes I have lying around year after year and never remember to use…


Then I found my recent purchase of flower stencils, you can find similar here. I also used this glue to provide a tacky fix to the terracotta pots and dishes and I used my favourite Laura Ashley Old Rose paint. The clean flower stencils need a light coating of the glue and you really do need to hold the can way back otherwise you end up with something that resembles that Christmas snow you can also get in a spray can and it takes forever to remove when you come to clean the stencil at the end. So begin by dusting off obvious dirt if you are using terracotta pots that have already been weathered. Cut your stencil to fit and fix to the terracotta pots and in my case dishes too with the spray glue. Since the natural curve of the pot wants to test the strength of the glue, I used sellotape too ensuring a firm fix.


And here’s where the magic will happen if you have the right tools. Remember this mistake? You would think I would learn that success is partially in having the right tools. I didn’t have a stencil brush so I tried the craft with an offcut of (Mr M’s car washing) sponge (which he hasn’t noticed yet) and then a craft sponge on a stick since both the craft sponge and indeed a soft roller brush served me well last time. This time the fine lines of the flower stencils are so close together, unless every one is very firmly stuck down, the paint will bleed under the lines. And since you can only spray the glue lightly or you know what happens, it is jolly difficult to get a firm fix on all those lines. Oh and if you have too much paint on your sponge that doesn’t help either; you need the thing you’re using to be almost dry. In short you need a strong dry bristly brush to jab effectively at your stencil. I should have photographed the disasters. They weren’t pretty. This was a disaster I attacked with a piece of wire wool once it was dry…oddly enough I quite like this result…

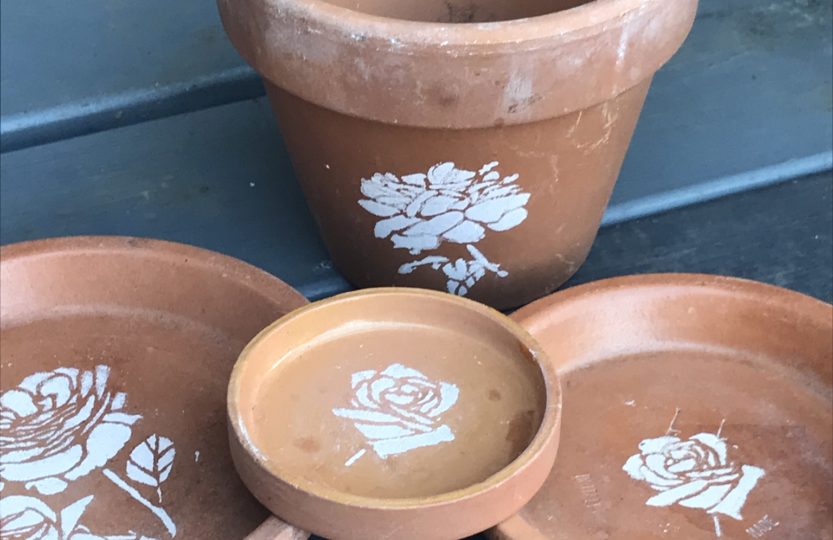
And there was a little hissy fit (my second week on the trot you will recall) and I did declare for all to hear that I never again would turn my hand to another craft. I’m not sure where Mr M was for this weeks hissy fit… guess he remembered the last one and stepped away. So in the absence of a real stencil brush and determined not to be beaten, I chopped up a hard bristle brush for this craft which did work although I recommend you get one of these which I now have on order, if you haven’t got one already. One last tip, let the paint dry thoroughly before removing the stencil to ensure no further chance of bleed or smudging. Don’t ask. Do it properly and you’ll end up with something like this…


Choose a sealer to match your need. I would like these to flake and fade in time so I used two coats of this acrylic sealer which will help protect yet not last forever. And in the craft cupboard I found some little fabric pads which I placed underneath each of the dishes to protect surfaces…

And once I had the hang of this craft, nothing was stopping me from stenciling every last piece of terracotta in sight…


I also had a go at transferring words onto other terracotta pots for a different type of pot decoration using this method which I have used successfully before…


And this is the pot stand I mentioned at the beginning. Complete with its lovely big split. I just simply applied white acrylic followed by a wash of grey and experimented with a different flower stencil and again fixed with the same sealant once the design was dry. I’m sure it won’t stand up to burning hot dishes… could just flip it over for that purpose I suppose. It would also make for an attractive centre piece for homemade salad dressings and garden flowers for the wonderful summer suppers we are all enjoying outdoors…

This little set will be gifted. I’ll add a selection of seeds from my Wildflower Garden when they are ready and hope that a friend will enjoy these in their garden too…

Have you given flower pot decoration of any sort a try? Do let me know, I really do love to see a comment or two from you below. And if you are interested, I’ve pinned a few of other crafty people’s ideas for garden pot decoration on this Pinterest board These garden pots look fabulous teamed up with homemade diy plant labels; tutorials for two of my own can be found here and here.
You may have a break from all my antics next week if you like. Master M is home from his travels and we have much to catch up on and do. I’ll be back the following week with a few homestyling tips you may enjoy so until then, thanks for reading and be sure to have a wonderful week x

You can find other crafty posts here and here if you are looking for inspiration or gift ideas.


Ahh lovely Molly… funnily enough I like the one that went wrong too! I have a chest of drawers waiting patiently for another day… I did think maybe Belle should have a subtle little tatoo!! Have a lovely week x
I really did ‘jab’ at this craft too!! Thank you darling you are too kind to me and I’m so glad you like them. Your brother and I bought more pots today… I feel another jabbing session coming on!x
Sally it was really lovely to meet you too… I do hope you’ll come again! Master M and I have been on a treasure hunt today to the local charity shops and had lunch together, itw as a lovely day out and we bought a few more pots to stencil so, watch this space! Have a wonderful week!x
It was lovely to meet you last week. And now I can visualise you stencilling away. !!! Glad Master m is home safe and sound !
Hahaha!! “jab effectively” is quite possibly the funniest two words you have written because it sums up exactly what it looks like you’re doing when you craft and faff but SOMEHOW the most beautiful, thoughtful and special things are created by you time and time again! You amaze me xxxxxxxx
Another lovely blog Helen. I quite like the ones that didn’t play ball and you attacked with wire wool too.
I am a firm believer stencilling is on its way back with a new twist. Particularly on furniture…I think you could do a fab chest of drawers 😉
As ever such an inspirational blog. You always leave me wanting to have a go at your project! Xx